
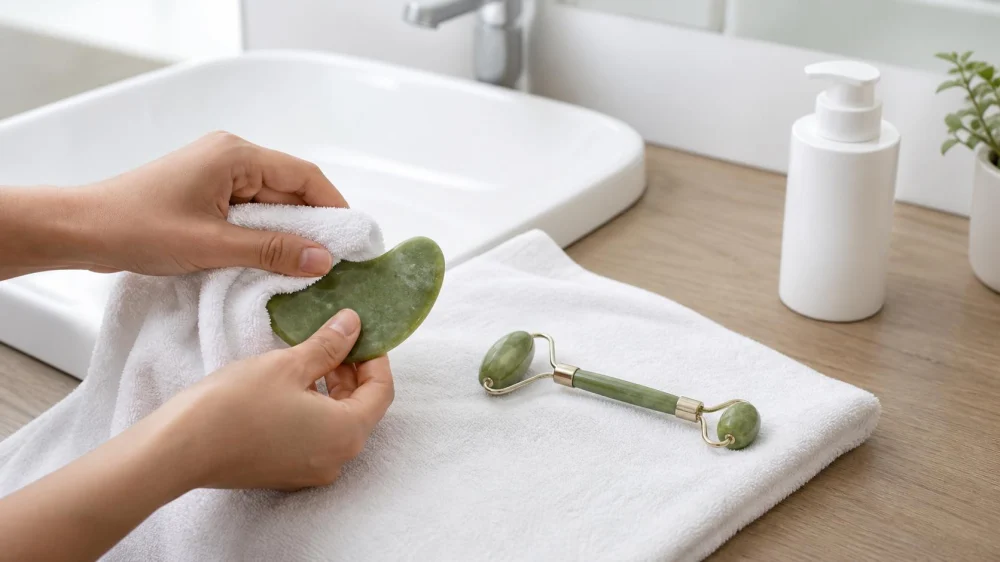
Facial Tool Hygiene: Clean Rollers and Gua Sha Safely
On this page
Quick answer
Clean a facial roller or gua sha tool according to its manufacturer after each use, then dry it completely before protected storage. Wash your hands first, avoid sharing personal tools, and inspect for cracks, rough edges, loose hardware, trapped product, or corrosion. Do not use a tool over broken, infected, inflamed, sunburned, or recently treated skin unless a qualified clinician has specifically cleared it.
This guide covers reusable, non-powered personal facial tools used for cosmetic massage or product application in the United States. It does not establish that these tools treat a disease, change facial structure, or provide lasting medical benefits. Powered devices, microneedling tools, extraction tools, and instruments used in professional procedures require different instructions and are outside this guide.
Why facial tool hygiene matters
A facial roller or gua sha tool repeatedly contacts skin oils, sweat, skin-care products, hands, counters, and storage containers. Product can collect near roller axles, seams, textured surfaces, chips, or protective sleeves. Returning a damp or contaminated tool to the face can spread residue and add friction.
Cleaning is not the same as sterilization. A home wash can remove visible product and routine soil when the material allows it, but it does not turn a cosmetic tool into a sterile medical instrument. Marketing terms such as “antimicrobial,” “healing stone,” or “self-cleaning” should not replace the care instructions.
The safest routine is simple: clean hands, intact skin, a compatible tool, enough slip to avoid dragging, light pressure, and prompt cleaning and drying. More pressure or more frequent use does not prove a better result.
Identify the material and construction
Before the first cleaning, read the packaging and care guide. Similar-looking tools may be made from natural stone, glass, stainless steel, ceramic, coated metal, resin, or mixed materials. A roller may contain adhesive, metal pins, bushings, or a handle that should not be soaked.
Check the following:
- Water tolerance: Can the entire tool be rinsed, or should only the contact surface be wiped?
- Cleaner compatibility: Which soap or cleanser does the maker allow? Are alcohol, bleach, peroxide, essential oils, or disinfectant wipes prohibited?
- Temperature limit: Hot water, boiling, a dishwasher, freezer, or ultraviolet device can crack, loosen, warp, or discolor some materials.
- Surface condition: Look and feel for chips, sharp areas, cracks, cloudiness, peeling coating, rust, or residue in seams.
- Moving parts: Make sure a roller turns smoothly without wobbling, squeaking from trapped debris, or exposing a pin.
If instructions are missing, contact the manufacturer rather than guessing. Do not assume that a stone name proves composition, durability, or a safe disinfectant method.
Cleaning and drying steps
- Prepare a clean area. Move the tool away from the sink basin, toilet, dirty towels, and splashing products. Wash and dry your hands.
- Remove visible product promptly. Do not let oils, creams, or masks harden in joints. Follow the tool's directions about rinsing or wiping.
- Use compatible cleaner. If the maker allows washing, apply a small amount of the recommended gentle cleanser with clean fingertips or a designated soft cloth. Avoid abrasive pads.
- Clean seams carefully. Rotate a roller to reach the exposed contact surface, but do not force the axle or pry apart bonded pieces.
- Rinse as directed. Remove cleaner residue without soaking components that should remain dry.
- Dry immediately. Blot with a clean, lint-free towel, then place the tool on a clean dry surface with air circulation until no moisture remains.
- Inspect before storage. Look for damage, retained residue, odor, discoloration, or moisture around hardware.
Use a fresh towel section rather than a damp hand towel that has been used for faces, hands, or counters. If the tool falls on the floor or into the sink, clean it again before it touches the skin.
Storage, products, and sharing
Store the fully dry tool in a clean, ventilated pouch or container according to the maker. A sealed case can trap moisture when the tool is put away too soon. An open bathroom counter exposes it to spray, dust, and other household activity.
Do not share a personal facial tool. If a salon or service provider uses reusable tools, ask how they are cleaned and disinfected between clients, whether the process matches the material and local rules, and how clean items are separated from used ones.
Do not dip a used tool directly into a product jar. Dispense the amount needed with clean hands or a clean applicator so skin contact is not returned to the container. The U.S. Food and Drug Administration advises washing hands before cosmetics use, keeping containers clean, following labels, and not sharing makeup because contamination can be transferred.
Refrigerating a tool is optional only if the manufacturer permits it; cooling does not clean or disinfect it. Never freeze a tool unless the maker explicitly says it is designed for that use, and avoid temperature extremes that could crack material or make the surface uncomfortably cold.
Skin-use checklist
Before each use:
- wash and dry your hands;
- start with gently cleansed skin according to your routine;
- confirm the tool is clean, dry, smooth, and intact;
- use only a skin product compatible with you and the tool, with enough slip to prevent dragging;
- keep pressure light and movement controlled;
- stay away from the eyeball and avoid scraping close to sensitive eye tissue;
- stop if the tool catches, pinches, hurts, or creates persistent redness; and
- clean the tool immediately afterward.
A dermatologist, surgeon, injector, or other treating clinician may recommend a temporary pause after a procedure or during a flare. Follow their aftercare timing rather than a generic online routine.
Limitations and stop signs
Do not use a roller or gua sha tool over an open wound, active skin infection, draining lesion, cold sore, severe rash, inflamed acne lesion, sunburn, unexplained swelling, or a painful area. Avoid use after injections, laser procedures, peels, surgery, or other treatment until the treating professional clears it.
Stop and arrange appropriate care for worsening pain, warmth, swelling, spreading redness, pus, blistering, eye symptoms, fever, or a persistent reaction. Seek urgent care for trouble breathing, facial or throat swelling, faintness, or other signs of a severe allergic reaction.
Discard or replace a tool when it has a sharp chip, crack, porous damage, loose part, peeling coating, corrosion, trapped contamination that cannot be removed, or a changed surface that the maker cannot confirm as safe. Repairing it with household glue can create an uneven, hard-to-clean surface.
Sources and evidence notes
The FDA cosmetics safety guidance recommends following labels, washing hands, avoiding sharing, keeping containers clean, and discarding changed products. The American Academy of Dermatology emphasizes gentle, non-abrasive face care and avoiding scrubbing. This article applies those principles to personal facial tools while deferring material-specific cleaning to the manufacturer.
Frequently asked questions
Can I wipe a facial roller with alcohol?
Only if the manufacturer confirms the concentration and method are compatible with every material and joint. Alcohol can affect adhesives, coatings, natural materials, and finishes. Cleaning instructions take priority over a generic disinfecting tip.
How often should I clean a gua sha tool?
Clean it after each use and any time it touches an unclean surface. Prompt cleaning prevents product from drying in surface details and keeps the next use from starting with old residue.
Can family members share one tool after cleaning it?
A personal tool is best kept to one user. Home cleaning methods and material limits vary, and sharing adds an avoidable route for transferring product, skin oils, or microorganisms.
Does storing a roller in the refrigerator keep it clean?
No. Cooling is not cleaning. A refrigerator may expose the tool or case to spills and moisture. Clean and dry it first, then refrigerate only when the manufacturer permits that storage method.
Should the skin turn red during gua sha?
Do not use redness as proof that a tool is working. Persistent redness, bruising, pain, burning, or swelling means stop. Use lighter pressure or discontinue the tool, and ask a dermatologist about ongoing symptoms.
Next steps
Find the care instructions for your exact tool, inspect its surface and moving parts, and set up a clean drying area outside splash zones. Wash hands, avoid broken or inflamed skin, use light pressure, and clean the tool after every use. Replace any tool that can no longer be cleaned to a smooth, intact condition, and seek dermatology advice for persistent irritation or uncertain skin changes.




 Corrective Skin Care Center0.0 (0 reviews)
 KYMA Cosmetic Surgery | Anti-Aging Center4.0 (39 reviews)
 Silk Skin Laser Care5.0 (9 reviews)
 bare MedSpa & Wellness4.0 (124 reviews)
 Advanced Esthetics of Richardson, LLC4.0 (134 reviews)
 Maine Laser Skin Care & Medi Spa4.0 (143 reviews)
 Skin Care Around the Eyes: A Product Safety Checklist
 The Top 5 Ingredients You Should Always Avoid in Skin Care Products
 Understanding Moisturizer to Improve Age Spots for Healthier Skin
 The Best Natural Ingredients for Skin Care
 Best Practices For Face Masks To Improve Dull Skin
 Why You Should Consider Adding Collagen Supplements to Your Skin Care Routine